Why You'll Love It
- - Minimal prep, max flavor
- - Warm caramel aroma fills the home
- - Soft apple layers underneath a buttery crust
- - Perfect for impromptu gatherings
“The caramel apple dump cake was a hit—sweet, buttery, and ready in no time!”
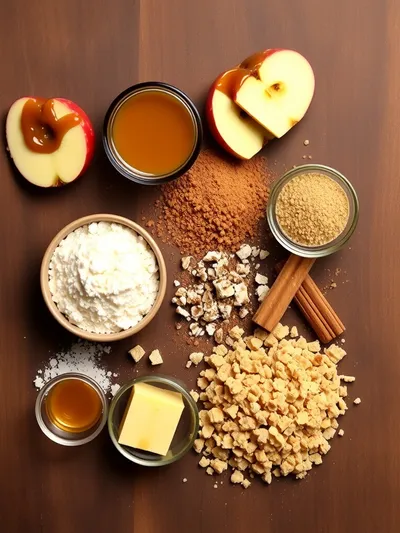
Essential Ingredient Guide
- Apples: Choose firm, slightly tart apples; they hold shape and balance the sweet caramel.
- Caramel sauce: A good-quality caramel adds depth; stir gently to avoid scorching.
- All‑purpose flour: Creates the tender, cakey topping that puffs up during baking.
- Brown sugar: Adds a molasses‑rich sweetness that pairs with caramel.
- Lemon juice: A splash brightens the apples and prevents browning.
- Butter: Melted butter gives the topping a rich, golden crust.
Complete Cooking Process
-
Ingredient Readiness:
Wash, core, and slice apples; melt butter and measure dry ingredients.
-
Flavor Development:
Combine apples with caramel and lemon, letting the flavors meld as they sit.
-
Texture Control:
Stir flour, sugar, and butter together; the crumble will rise and set a soft crust.
-
Finishing Touches:
Scatter the crumble over the apple mixture, then bake until golden.
-
Serving Timing:
Allow the cake to cool just a few minutes so the sauce settles, then serve warm.
- Use a mix of sweet and tart apples for depth
- Brush the top with a little extra butter for extra gloss
- Serve with a scoop of vanilla ice cream for contrast
- Store leftovers in the fridge; reheat gently
Pro Tips
Well, those little adjustments can turn an easy dump cake into a memorable dessert. I find that the extra butter brush gives a beautiful sheen, and the ice cream adds that cool counterpoint to the warm caramel. It’s a simple pleasure, and you’ll notice the difference the next time you serve it.
The essence of the dish:
A fun fact or historical angle:
Flavor or sensory focus:
You Must Know
- Don’t over‑mix the crumble; keep it lumpy for texture
- Use room‑temperature butter for even spreading
- Let the cake rest before slicing
Frequently Asked Questions
→ Can I use frozen apple slices?
Yes, thaw them first and pat dry; this keeps the topping from getting soggy.
→ What other fruits work well?
Pears or berries create a lovely variation; just adjust the sweetness accordingly.
→ How long does it keep?
Store in an airtight container; it stays fresh for up to three days in the fridge.
→ Can I make it gluten‑free?
Swap the all‑purpose flour for a 1‑to‑1 gluten‑free blend; the texture remains tender.
→ Do I need to pre‑heat the pan?
No, just pour the batter into a room‑temperature baking dish; it rises evenly.
→ What’s a good serving suggestion?
A dollop of vanilla ice cream or a drizzle of extra caramel makes it extra special.
Chef's Tips
If you like extra sweetness, drizzle a bit more caramel right after baking.,For a nuttier flavor, sprinkle chopped walnuts on top before baking.,A pinch of sea salt on the final drizzle enhances the caramel’s depth.
Nutrition Facts
per serving
420
Calories
3g
Protein
62g
Carbs
16g
Fat
Taste Profile
Rich caramel sweetness balanced by tart apples
Ingredient Substitutions
Don't have an ingredient? Try these alternatives
Will give a nuttier flavor; may make the topping denser.
Provides a lighter sweetness; reduce brown sugar slightly.
Recipe Variations
Try these delicious twists on the original
Spicy Version
Add a pinch of ground ginger and a drizzle of do nothing cake spice mix for warmth.
Mediterranean Style
Stir in chopped dried apricots and a splash of orange zest for a bright twist.
Common Mistakes to Avoid
Learn from others' mistakes for perfect results
- Over‑mixing the crumble, which makes it dense.
- Using overly soft apples that turn mushy.
- Baking at too high a temperature, burning the topping.
Meal Prep & Storage
Make Ahead Tips
You can slice and toss the apples with caramel up to 24 hours ahead; keep refrigerated and bring to room temperature before baking.
Leftover Ideas
Reheat gently in a skillet over low heat, covering to retain moisture, or microwave for 30 seconds.
Perfect Pairings
Serve this with...
Cooking Timeline
Prepare ingredients: slice apples, melt butter, and pre‑heat oven.
Combine apples with caramel, lemon juice, and cinnamon; spread in dish.
Mix flour, brown sugar, and butter into crumble; scatter over apples.
Bake until golden; let cool slightly before serving.
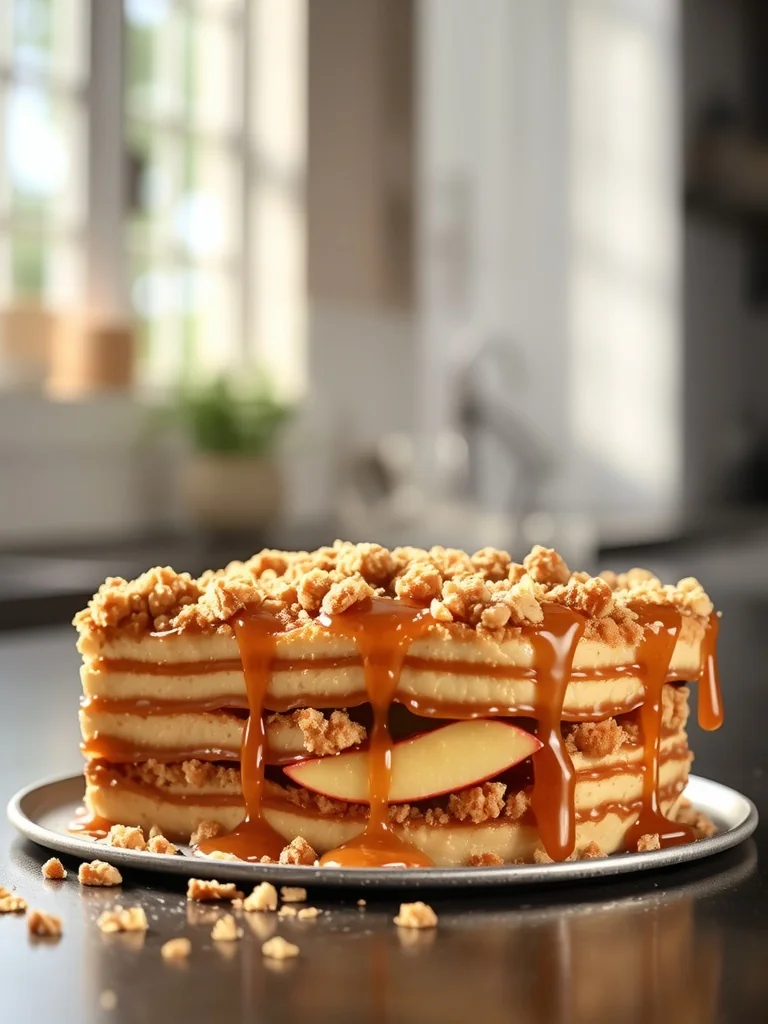
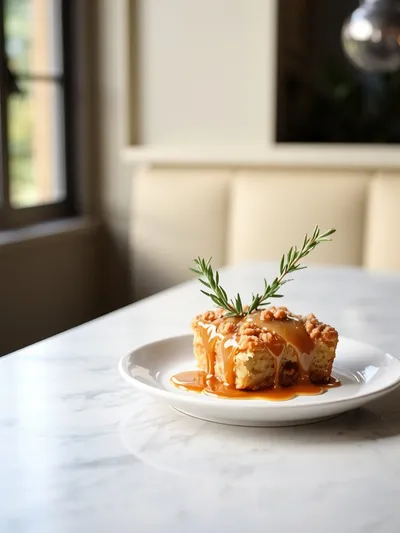
Caramel Apple Dump Cake
A warm, caramel‑kissed apple dump cake that comes together in minutes—perfect for a cozy evening. Pair it with a cup of tea and maybe a hint of peach dump cake for a seasonal twist.
Timing
Prep Time
15 Minutes
Cook Time
30 Minutes
Total Time
45 Minutes
Recipe Details
Ingredients
Main Ingredients
- 01 4 cups sliced apples (about 3 medium apples)
- 02 1/2 cup caramel sauce
- 03 2 tablespoons lemon juice
- 04 1 cup all‑purpose flour
- 05 1/2 cup brown sugar
- 06 1/4 cup melted butter
- 07 1 teaspoon ground cinnamon
Optional Topping
- 01 Vanilla ice cream for serving
- 02 Extra caramel drizzle
Instructions
Preheat the oven to 350°F (175°C) and lightly grease a 9‑inch square baking dish.
In a bowl, toss the apple slices with caramel sauce, lemon juice, and cinnamon; spread evenly in the dish.
In another bowl, combine flour, brown sugar, and melted butter; stir until the mixture resembles coarse crumbs.
Scatter the crumb topping over the apples, pressing gently to adhere.
Bake for 30‑35 minutes, until the top is golden and the apples are bubbling; let cool slightly before serving.
Notes & Tips
- 1 If you like extra sweetness, drizzle a bit more caramel right after baking.
- 2 For a nuttier flavor, sprinkle chopped walnuts on top before baking.
- 3 A pinch of sea salt on the final drizzle enhances the caramel’s depth.
Tools You'll Need
-
9‑inch square baking dish
-
Mixing bowls
-
Silicone spatula
-
Measuring cups and spoons
-
Oven
Must-Know Tips
- Don’t over‑mix the crumble; keep it slightly chunky for texture.
- Let the apples sit with caramel for a few minutes before adding the topping.
- Serve warm for the best caramel aroma.
Professional Secrets
- Room temperature butter blends more evenly, preventing soggy spots.
- Caramel should be gently warmed, not boiled, to keep a smooth texture.
- Baking on the middle rack ensures even browning of the crust.
Recipe by
NicoleJane Doe is the culinary heart and voice behind Your Website, a vibrant personal blog that celebrates home‑cooked goodness for the modern American kit ...
Get Delicious Recipes Weekly
Join 25,000+ home cooks getting our best recipes straight to their inbox.
Free forever • No spam • Unsubscribe anytime